
On Windows 10, how do you address the 'WiFi Doesn't Have A Valid IP Setup' issue?
 |
| How To Fix WiFi Doesn't Have A Valid IP Configuration Problem? |
Just about 1% of the world's population was online in 1995. Twenty years later, more than three billion people, or almost half of the world's population, have access to the Internet. It can be aggravating to be unable to connect to the Internet these days, and it can make you feel like you've been transported back to 1995. If you're running Windows 10 and having the "WiFi doesn't have a valid IP setup" error, you know how annoying it can be. This disables WiFi connectivity and is a common problem among Windows users. Even if you have an Ethernet link on your device, the issue of not having a correct IP configuration will occur. The good news is that this issue is simple to resolve.
The error message "WiFi doesn't have a correct IP configuration" means that there is an issue with your computer's TCP/IP stack, which is a set of network protocol layers that can interact negatively and cause your Internet connection to be disrupted. When troubleshooting, you may have come across this error message. Unfortunately, Windows Troubleshooting typically only detects issues, not solutions; you must manually fix the issue. A defective network, incorrect network settings, hardware issues, network problems from your network provider, disabled Windows network services, and other factors may all contribute to the configuration problem.
Your IP Address Can Be Published And Renewed
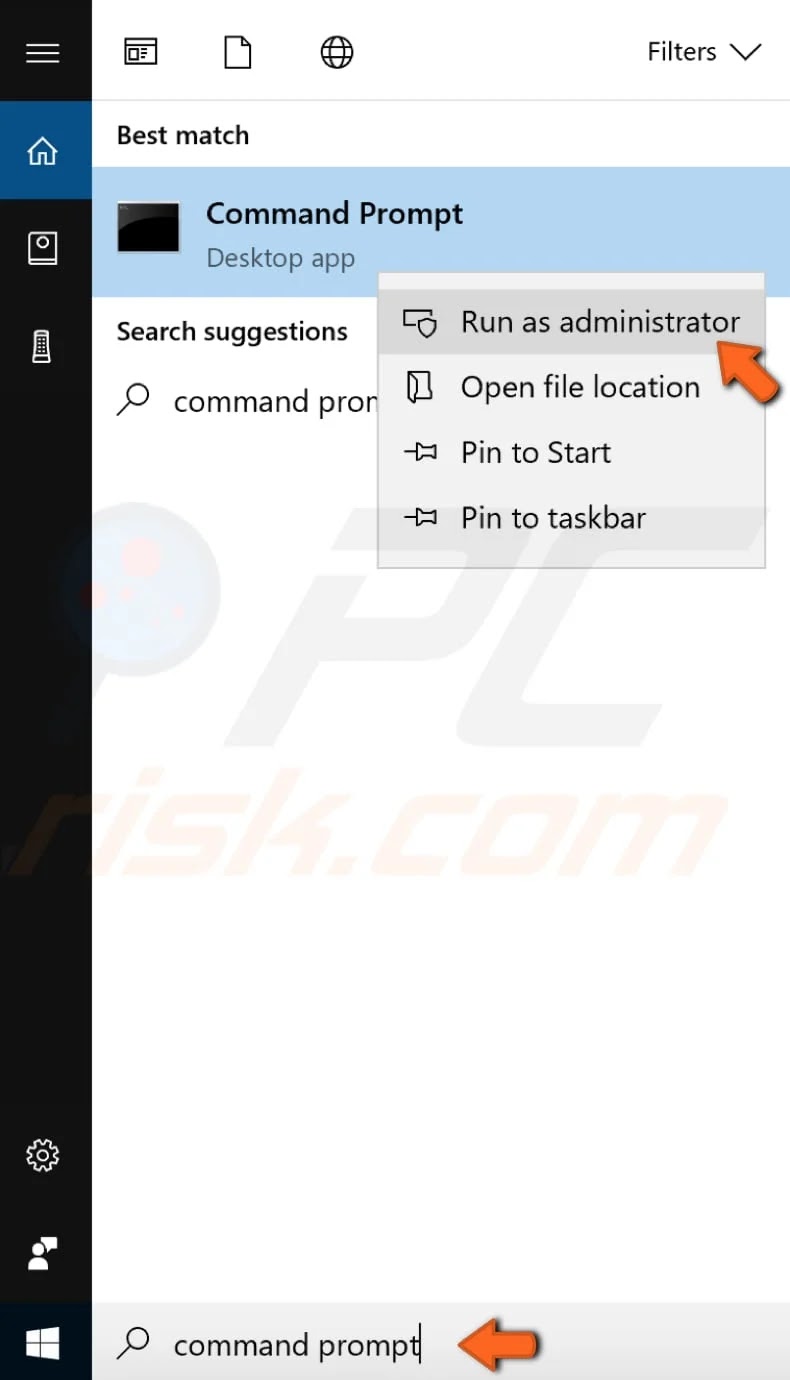
Using Command Prompt to run commands could be the quickest way to resolve the "WiFi doesn't have a valid IP setup" problem. To begin, open Command Prompt by searching for "command prompt" and right-clicking on "Command Prompt." Then choose "Run as administrator" to run it as an administrator.
Type "ipconfig /release" in the Command Prompt window and hit Enter on your keyboard. In the instruction, make sure there is a space between "ipconfig" and "/release."

Replace "ipconfig /renew" with "ipconfig /renew". You must also have a space after "ipcongif" in this command. Enter the code.

To exit Command Prompt, type "exit" and press Enter once you've done entering the commands. To see if restarting your machine solved your dilemma, try it.
TCP/IP should be reset.
This one is also straightforward: use Command Prompt to run commands. By right-clicking on Command Prompt and selecting Run as Administrator, you can reopen it from Search. Type "netsh winsock reset" in the Command Prompt window and press Enter on your keyboard.

Then, on your keyboard, type "netsh int ip reset" and press Enter. Exit Command Prompt and restart your machine to see if the issue has been resolved.

Wireless Adapter Driver should be uninstalled.
A faulty network driver can cause the error "WiFi doesn't have a valid IP configuration." You should try uninstalling the wireless adapter driver and then letting Windows 10 reinstall it for you the next time you start Windows. Go to Device Manager to disable your network adapter driver. Search for "system manager" and select the "Device Manager" result.

Locate "Network adapters" in the System Manager window, extend it, and right-click on your wireless device. From the drop-down menu, pick "Uninstall."

You'll be prompted to confirm the removal. "OK" should be selected. If you see this option, select "Delete the driver programme for this computer."

For the changes to take effect, you will need to restart your computer. Check to see if restarting your machine solved the issue.
Manually customise your IP address
When you connect to Wi-Fi, you'll normally be assigned an IP address, which is handled by DHCP. Something is wrong with the valid IP configuration, and DHCP fails to obtain a valid IP address. You can manually add a valid IP address to fix this problem by right-clicking on Start and choosing "Network Connections."

To view network adapters and change connection settings, go to the Network status window and press "Change adapter options."

Your network link form will be shown. Your wireless link should also be visible here (in our case, we see the Ethernet connection because we are using a wired connection). In the drop-down menu, right-click on your wireless link and choose "Properties."

To highlight "Internet Protocol Version 4 (TCP/IPv4)," press "Properties," then "Internet Protocol Version 4 (TCP/IPv4)."

The Internet Protocol Version 4 (TCP/IPv4) Properties window will appear. Mark "Use the following IP address:" and "Use the following DNS server addresses:" in this box, then type the IP address, subnet mask, and default gateway, preferred DNS server, and Alternative DNS server. As an example, you can use our screenshot.
Note: If your router's LAN IP address is 192.168.1.1, you may change it to 192.168.1.x (x is a number between 2 and 253), with 255.255.255.0 as the subnet mask and 192.168.1.1 as the default gateway.

To see if this solution solved the problem, click "OK" and restart your machine.
Clean-up the boot
You can also try performing a clean boot of your Windows 10 operating system to see if that helps. A clean boot is a method of starting Windows with the bare minimum of drivers and startup programmes. This helps you prevent device conflicts when you instal or upgrade a programme, or when you run a programme in Windows. This means you'll need to turn off all third-party apps and utilities to see if any of them are messing with your wireless network and stopping you from communicating. To do a clean boot, type "device setup" into the command prompt Open the desktop software by searching for it. Another way to get to System Configuration is to search for "run," open it, type "mschonfig," and then click OK to start it.

Select "Selective startup" to make adjustments and unmark "Load startup objects" when System Configuration opens.

Then, on the "Services" tab, select "Hide all Microsoft services" from the drop-down menu. Microsoft software and utilities will be hidden as a result of this (because we need to disable only third-party applications). Just two programmes remain in our situation. "Disable anything" should be picked.

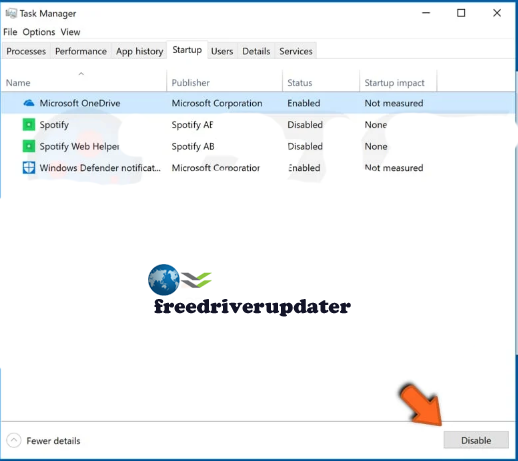
A list of startup applications will appear in the Task Manager window until it is opened. Disable each allowed application by right-clicking it. You can also disable the feature by clicking the "Disable" button in the bottom-right corner.
Close Task Manager and press "Apply" and "OK" in the System Configuration window until all startup applications have been disabled. Then, to make the adjustments take effect, restart your machine. Check to see if this was helpful in resolving the problem. If the issue has been resolved, it is likely that one of the services is to blame. You should try enabling them one at a time to see which one is causing the issue, then uninstall it.
Remove your antivirus software from your computer.
Antivirus software has been connected to the "WiFi doesn't have a legitimate IP configuration" bug, according to users. If that's the case, you'll have to delete it from your Windows operating system. If your Internet connection is still working after the uninstall, you can reinstall your antivirus software (the most current version is recommended) or turn to another antivirus application. Remove your antivirus programme to see if it makes a difference.
Increase the number of people who use DHCP.
Some users claim that increasing the number of DHCP users would solve the issue. Routers usually have a maximum of 50 DHCP users, which may be the cause of the "WiFi doesn't have a valid IP setup" error. To resolve this problem, go to your router's settings and manually change the DHCP number of users. Some users also recommend that you increase the maximum number of wireless users (some routers are limited to only 10 wireless users). Check your router's manual for guidance on how to increase the number of DHCP users. This will assist you in resolving your IP configuration problem.
Drivers for Network Adapters should be modified.
An old or incorrect driver could be the source of this issue. In this scenario, you'll need to get a new/updated network adapter driver. Snappy Driver Installer makes it easy to do this automatically. To download it, you'll need a device with an active internet connection.
Snappy Driver Installer (SDI) is a free Windows driver updater application that can store the entire driver set offline. Snappy Driver Installer can access quick driver updates even if there isn't an active internet connection thanks to offline drivers. Snappy Driver is compatible with Windows 10, Windows 8, Windows 7, Windows Vista, and Windows XP in both 32-bit and 64-bit models. Snappy Driver Installer is used to download drivers.
Driverpacks are essentially sets (packs) of drivers for different hardware such as sound devices, video cards, network adapters, and so on. It can also identify duplicate and invalid drivers, as well as differentiate between changes that enable you to restart your machine and those that do not. Snappy Driver Installer is available for download here.

After you've finished downloading and installing drivers, restart Windows 10 to see whether they've taken impact.
You can also manually update your car, but you'll need a device with an active Internet connection to do so. Download the new driver for your network adapter from the manufacturer's website and save it to your USB drive. Navigate to the Device Manager (type "device manager" in Search and open it). Expand the "Network adapters" portion, then right-click on your network adapter. Then pick "Update Engine."

You'll be asked how you want to look for drivers, and you'll have two options: 1) automatically check for modified driver software; 2) manually search for driver software on your computer. The first choice necessitates the use of the Internet (if you have problems with your internet connection, choose the second option). Follow the directions to find the driver on your USB drive.

After you've finished installing the new/updated driver, restart your device to see if the network access issue has been resolved.
If you get the "WiFi doesn't have a correct IP setup" error, one of these solutions can resolve your connectivity problem and get you back online!